20 Nov 2024
I had an interesting interview recently where the interviewer asked me what do you write in a Rails controller.
I’ve written a lot of web apps and APIs and I really couldn’t understand the aim of the question.
Is it a probe in the technical depth of how web frameworks work, or appreciation of how the controller organizes seperation of concerns?
Something i’ve realized is modern day to day work is simply magic we don’t think about.
To appreciate why this matters, let’s remember what web development looked like before MVC frameworks. Here’s a typical PHP script from the early 2000s:
<?php
// article.php - A single file handling database, business logic, and view
$conn = mysql_connect("localhost", "user", "password");
mysql_select_db("blog");

if ($_POST['action'] == 'create') {
    $title = mysql_real_escape_string($_POST['title']);
    $content = mysql_real_escape_string($_POST['content']);
    mysql_query("INSERT INTO posts (title, content) VALUES ('$title', '$content')");
    header("Location: article.php");
}

$result = mysql_query("SELECT * FROM posts ORDER BY created_at DESC");
?>

<html>
<body>
    <form method="post">
        <input type="hidden" name="action" value="create">
        Title: <input type="text" name="title"><br>
        Content: <textarea name="content"></textarea><br>
        <input type="submit" value="Create Post">
    </form>

    <?php while ($row = mysql_fetch_assoc($result)) { ?>
        <h2><?php echo htmlspecialchars($row['title']); ?></h2>
        <p><?php echo htmlspecialchars($row['content']); ?></p>
    <?php } ?>
</body>
</html>
The PHP example shows:
- Database connection mixed with business logic
- SQL queries embedded directly in the page
- HTML templates mixed with PHP code
- No separation of concerns
- Basic security handled manually (mysql_real_escape_string)
However, understanding this “magic” becomes crucial when:
- Debugging complex routing issues
- Building custom middleware
- Optimizing application performance
- Designing APIs that deviate from Rails conventions
Let’s peek behind the curtain and see how Rails transforms raw HTTP into the clean, object-oriented code we work with daily.
The HTTP Request Journey
Step 1: Raw HTTP Arrives
Everything starts with a raw HTTP request hitting your server:
GET /posts/5 HTTP/1.1
Host: example.com
Accept: text/html
User-Agent: Mozilla/5.0
Cookie: session=abc123
This text-based protocol carries all the information needed to process the request: method, path, headers, and potentially a body. But working with raw text would be cumbersome and error-prone.
Step 2: Rack Middleware Processing
Rack, the unsung hero of Ruby web applications, transforms raw HTTP into something more manageable.
env = {
  'REQUEST_METHOD' => 'GET',
  'PATH_INFO' => '/posts/5',
  'HTTP_ACCEPT' => 'text/html',
  'HTTP_COOKIE' => 'session=abc123'
}
This standardized hash becomes the common currency of request handling. Every piece of middleware can modify this hash, adding features like:
- Session handling
- Request parsing
- Authentication
- Logging
Step 3: Rails Router Takes Control
The router (config/routes.rb) acts as traffic control, determining which code should handle the request:
Rails.application.routes.draw do
  resources :posts
  # Expands to multiple routes including:
  # GET /posts/:id => posts#show
end
When a request arrives, the router:
- Matches the path and HTTP method against defined routes
- Extracts parameters from dynamic segments
- Identifies the target controller and action
Step 4: Controller Processing
Finally, we reach familiar territory. The controller receives a clean, normalized request:
class PostsController < ApplicationController
  def show
    @post = Post.find(params[:id])
    render json: @post
  end
end
All the complexity of HTTP has been abstracted away. We can focus on business logic rather than protocol details.
Why This Matters
For Development
- Understanding the request cycle helps you debug issues more effectively
- Knowledge of middleware lets you add cross-cutting concerns cleanly
- Appreciation of HTTP details improves API design
- Each layer adds some processing overhead
- Knowing the flow helps identify optimization opportunities
- Understanding middleware ordering can prevent unnecessary processing
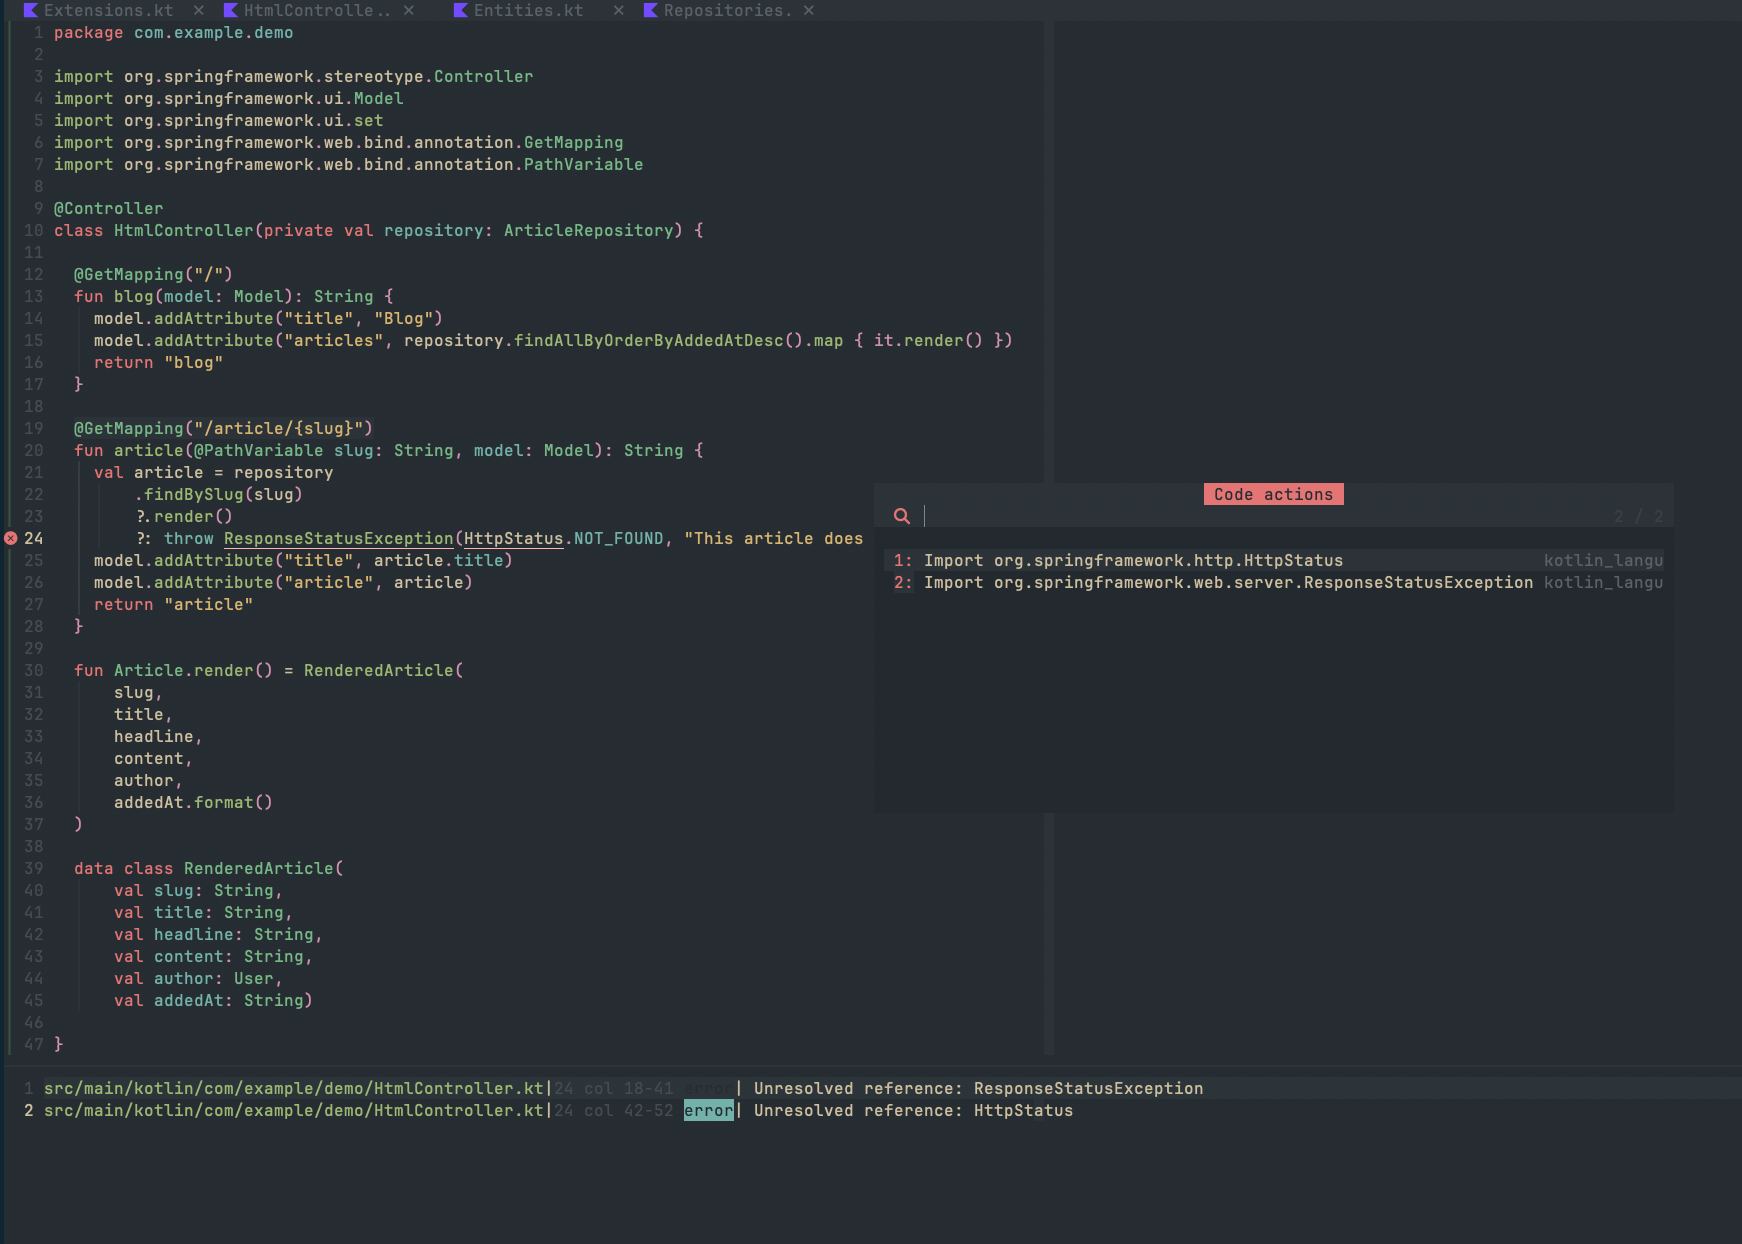
17 Nov 2024
After over a 6-year hiatus from Spring Boot in my professional work, I found myself curious about how the ecosystem had evolved.
I wondered if I could make it work without reaching for the traditional IntelliJ IDEA approach, because “nvim btw”.
Here’s what I discovered while attempting to modernize a Spring Boot Kotlin tutorial using just Neovim as my development environment.
Neovim boots up in less than a second and compilation is blazing fast.
The State of the Tutorial
The original Spring Boot Kotlin tutorial, despite its age, remains surprisingly relevant. However, there are several key modern considerations:
- Gradle configuration now uses the Kotlin DSL (
build.gradle.kts)
- Updated dependencies including Spring Boot 3.x and Kotlin 1.9.x
- Modern Java toolchain requirements (JDK 21)
- Usage of Jakarta EE instead of javax packages
- Enhanced Kotlin compiler options and Spring plugin configurations
Project Setup
Before diving into development, you’ll need to set up your environment. Here’s what you need:
Prerequisites
- Java Development Kit (JDK) 21
After installation, make sure JAVA_HOME is set correctly in your shell configuration.
- Gradle Build Tool
While the project includes the Gradle wrapper (gradlew), having Gradle installed locally can be helpful for other Kotlin projects.
- Clone and Build
git clone https://github.com/sngeth/spring-boot-kotlin-demo
cd spring-boot-kotlin-demo
./gradlew build
Neovim as Your Kotlin IDE
One of the most interesting aspects of this journey was using Neovim instead of traditional IDEs like IntelliJ IDEA. Here’s how to make Neovim a powerful Kotlin development environment:
- Kotlin Language Server: The backbone of Kotlin development in Neovim
- Provides code completion
- Offers type information
- Handles syntax highlighting
- Detects missing imports automatically
brew install kotlin-language-server
- LSP Configuration:
require('lspconfig').kotlin_language_server.setup({
  cmd = { "kotlin-language-server" },
  filetypes = { "kotlin" },
  root_dir = require('lspconfig.util').root_pattern(
    "settings.gradle",
    "settings.gradle.kts",
    "build.gradle",
    "build.gradle.kts"
  )
})
- Code Actions: This functionality comes from multiple sources:
- The built-in LSP client in Neovim (
:h lsp)
nvim-cmp for completionnull-ls or none-ls for additional formatting- Popular plugins like
nvim-code-action-menu
Development Workflow
Instead of relying on IDE-integrated build tools, the workflow becomes:
This continuous build approach:
- Watches for file changes
- Recompiles automatically
- Provides quick feedback on errors
- Eliminates the need for IDE-specific build processes
Advantages of This Setup
- Lightweight Development Environment
- Faster startup times
- Lower resource usage
- Familiar Vim keybindings
- Modern Development Features
- Code completion via LSP
- Inline error highlighting
- Jump-to-definition functionality
- Symbol search across the project
- Build Process Transparency
- Clear visibility of the build process
- Direct control over Gradle commands
- No IDE abstraction layer
Common Pitfalls and Solutions
- Import Management
- Challenge: Missing IDE auto-import
- Solution: Kotlin Language Server handles this effectively
- Tip: Use
:LspRestart if imports aren’t updating
- Compile Error Detection
- Challenge: No immediate visual feedback
- Solution: Continuous Gradle build (
-t flag)
- Enhancement: Configure quickfix list integration
- Code Actions Availability
- Challenge: Understanding source of actions
- Solution: Multiple plugins working together:
- LSP for basic actions
- Additional plugins for enhanced functionality
- Custom keybindings for frequent actions
Recommended Neovim Plugins for Kotlin Development
- Base LSP Setup:
'neovim/nvim-lspconfig'
'hrsh7th/nvim-cmp'
'hrsh7th/cmp-nvim-lsp'
- Enhanced Functionality:
'nvim-code-action-menu'
'telescope.nvim'
'null-ls.nvim'
Conclusion
While the Spring Boot Kotlin tutorial may be showing its age, the core concepts remain solid. Combining it with modern tools like Neovim and the Kotlin Language Server creates a powerful, efficient development environment. The continuous build approach with Gradle provides quick feedback, while LSP integration offers many features traditionally associated with full IDEs.
This setup proves that you don’t need a heavy IDE to develop Spring Boot applications with Kotlin effectively. The combination of Neovim’s efficiency, LSP’s intelligence, and Gradle’s build tools creates a streamlined, modern development experience that can rival traditional IDEs while maintaining the flexibility and lightness of a terminal-based workflow.
14 Nov 2024
When developers think of C#’s extension methods, they often associate them with LINQ and .NET’s modern features. But did you know that this powerful programming concept has roots dating back to the 1970s?
The Smalltalk Origins
In the 1970s, Smalltalk introduced a revolutionary concept called “open classes.” This feature allowed developers to add methods to existing classes, even core library classes, at runtime. Here’s what it looked like:
Object subclass: #String
    instanceMethods: [
        shout [
            ^self asUppercase, '!'
        ]
    ]
This was groundbreaking at the time - the ability to modify existing types without subclassing them. This feature would later influence many modern programming languages.
Ruby’s “Monkey Patching”
Fast forward to the 1990s, and Ruby embraced this concept with its own implementation of open classes:
class String
  def shout
    self.upcase + "!"
  end
end

# Now every String instance has access to this method
puts "hello".shout  # Outputs: HELLO!
This feature became so popular (and sometimes notorious) in Ruby that it earned the nickname “monkey patching.” While powerful, it highlighted both the benefits and potential dangers of unrestricted type extension.
In 2007, C# 3.0 introduced what we now know as “extension methods.” This implementation took the lessons learned from dynamic languages and added static typing safety:
public static class StringExtensions
{
    public static string Shout(this string str)
    {
        return str.ToUpper() + "!";
    }
}

// Usage
"hello".Shout();  // Returns: "HELLO!"
C# formalized the concept and coined the term “extension methods” that many modern languages now use. The implementation addressed several key challenges:
- Safety: Extensions can’t override existing methods
- Scope: Extensions must be explicitly imported
- Clarity: The syntax makes it clear that it’s an extension
- Performance: Compile-time binding for better efficiency
Modern Language Implementations
CLOS (Common Lisp Object System)
;; Using generic functions
(defgeneric shout (thing))

(defmethod shout ((text string))
  (concatenate 'string (string-upcase text) "!"))

;; Usage
(shout "hello") ; Returns "HELLO!"
Kotlin
// Extension function
fun String.shout() = this.uppercase() + "!"

// Extension property
val String.doubleLength: Int
    get() = this.length * 2

// Extension with generics
fun <T> List<T>.secondOrNull(): T? = if (this.size >= 2) this[1] else null

// Usage
println("hello".shout())          // HELLO!
println("test".doubleLength)      // 8
listOf(1,2,3).secondOrNull()      // returns 2
Swift
extension String {
    // Simple extension
    func shout() -> String {
        return self.uppercased() + "!"
    }

    // Computed property
    var doubleLength: Int {
        return self.count * 2
    }

    // With parameters
    func repeated(times: Int) -> String {
        return String(repeating: self, count: times)
    }
}

// Usage
"hello".shout()           // "HELLO!"
"test".doubleLength       // 8
"ha".repeated(times: 3)   // "hahaha"
Scala
object StringExtensions {
    implicit class StringOps(val s: String) {
        def shout: String = s.toUpperCase + "!"

        def reverseShout: String = s.reverse.toUpperCase + "!"

        // With parameters
        def repeatTimes(n: Int): String = s * n
    }
}

// Usage
import StringExtensions._
"hello".shout        // "HELLO!"
"hello".reverseShout // "OLLEH!"
"ha".repeatTimes(3)  // "hahaha"
TypeScript
declare global {
    interface String {
        shout(): string;
        reverseShout(): string;
    }
}

String.prototype.shout = function(): string {
    return this.toUpperCase() + "!";
};

String.prototype.reverseShout = function(): string {
    return this.split('').reverse().join('').toUpperCase() + "!";
};

// Usage
"hello".shout();        // "HELLO!"
"hello".reverseShout(); // "OLLEH!"
Rust (Using Traits)
trait StringExtension {
    fn shout(&self) -> String;
    fn reverse_shout(&self) -> String;
}

impl StringExtension for String {
    fn shout(&self) -> String {
        format!("{}!", self.to_uppercase())
    }

    fn reverse_shout(&self) -> String {
        format!("{}!", self.chars().rev()
            .collect::<String>().to_uppercase())
    }
}

// Usage
let text = String::from("hello");
println!("{}", text.shout());         // "HELLO!"
println!("{}", text.reverse_shout()); // "OLLEH!"
What Makes This Interesting?
The evolution of extension methods shows how programming languages learn from each other:
- Smalltalk proved the concept was useful
- Ruby showed both the power and potential pitfalls
- C# formalized the approach with static typing
- Modern languages refined the implementation further
Key Takeaways
- Many modern programming features have roots in older languages
- Different languages can learn from each other across paradigms
- Good ideas evolve as we learn their strengths and weaknesses
- Static and dynamic languages can inspire each other’s features
10 Nov 2024
Building maintainable end-to-end tests doesn’t have to be complicated. While data-test attributes are a common approach, there’s an elegant alternative that aligns better with how users actually interact with your application. Let’s explore how we can write more resilient tests by focusing on user behavior and accessibility patterns.
Building User-Centric Tests
Let’s explore how we can build tests that mirror real user interactions. Here’s a typical user settings panel implementation:
// Initial component implementation
const UserSettingsPanel = () => {
  return (
    <div data-testid="settings-panel">
      <div data-testid="settings-header">
        <h2 data-testid="settings-title">User Settings</h2>
      </div>
      <div data-testid="settings-form-container">
        <form data-testid="settings-form">
          <div data-testid="email-group">
            <label data-testid="email-label">
              Email
              <input
                data-testid="email-input"
                type="email"
                name="email"
              />
            </label>
          </div>
          <button
            data-testid="save-button"
            type="submit"
          >
            Save Changes
          </button>
        </form>
      </div>
    </div>
  );
};

// Initial tests
describe('User Settings Panel', () => {
  it('should update user settings', () => {
    cy.get('[data-testid="settings-panel"]').should('be.visible');
    cy.get('[data-testid="email-input"]').type('[email protected]');
    cy.get('[data-testid="save-button"]').click();
    cy.get('[data-testid="success-message"]').should('be.visible');
  });
});
Later, your team decides to improve accessibility and semantic structure. A careful developer might update the component like this:
// Refactored component maintaining both test IDs and semantic structure
const UserSettingsPanel = () => {
  return (
    <main data-testid="settings-panel">
      <header data-testid="settings-header">
        <h2 data-testid="settings-title">User Settings</h2>
      </header>
      <form data-testid="settings-form">
        <fieldset>
          <legend className="sr-only">User Preferences</legend>
          <div className="form-group" data-testid="email-group">
            <label htmlFor="email" data-testid="email-label">Email</label>
            <input
              id="email"
              type="email"
              name="email"
              aria-describedby="email-help"
              data-testid="email-input"
            />
          </div>
          <button
            type="submit"
            aria-label="Save user settings"
            data-testid="save-button"
          >
            Save Changes
          </button>
        </form>
    </main>
  );
};
By focusing on semantic HTML and accessibility patterns, we can create a more maintainable approach that:
- Mirrors User Behavior: Tests interact with elements the same way users do
- Promotes Accessibility: Using ARIA labels and semantic HTML improves both testing and user experience
- Simplifies Component Structure: Components remain clean and focused on their primary purpose
A Better Approach
Instead of maintaining parallel identification systems, we could focus on testing the way users actually interact with our application:
// Component focusing on user interaction patterns
const UserSettingsPanel = () => {
  return (
    <main>
      <form aria-label="User Settings">
        <div>
          <label htmlFor="email">Email</label>
          <input
            id="email"
            type="email"
            name="email"
          />
        </div>
        <button type="submit">Save Changes</button>
      </form>
    </main>
  );
};

// Tests focusing on user interaction patterns
describe('User Settings Panel', () => {
  it('should update user settings', () => {
    cy.findByRole('form', { name: /user settings/i }).within(() => {
      cy.findByLabelText(/email/i).type('[email protected]');
      cy.findByRole('button', { name: /save changes/i }).click();
    });
    cy.findByRole('alert').should('be.visible');
  });
});
This approach offers several benefits:
- Tests actual user experience
- Encourages good accessibility practices
- Reduces maintenance burden
- Naturally resilient to refactoring
The Cypress Perspective
While Cypress actually recommends using data-* attributes in their Best Practices guide, there’s a growing movement in the testing community to reconsider this approach. Here’s why:
// Traditional Cypress test with data-test attributes
cy.get('[data-testid="login-form"]')
  .find('[data-testid="username-input"]')
  .type('[email protected]')

cy.get('[data-testid="submit-button"]').click()

// More resilient approach using user-centric selectors
cy.get('form').within(() => {
  cy.get('input[type="email"]').type('[email protected]')
  cy.get('button[type="submit"]').click()
})
Better Alternatives for Cypress
1. Use Semantic HTML and ARIA Roles
// Instead of:
cy.get('[data-testid="navigation"]')

// Use:
cy.get('nav')
// Or even better:
cy.get('[role="navigation"]')
2. Leverage Text Content and Labels
// Instead of:
cy.get('[data-testid="login-button"]')

// Use:
cy.contains('button', 'Log in')
// Or:
cy.get('button').contains('Log in')
// Instead of:
cy.get('[data-testid="email-input"]')

// Use:
cy.get('input[type="email"]')
// Or:
cy.get('label').contains('Email').siblings('input')
When Data Attributes Might Make Sense in Cypress
There are legitimate cases for data attributes in Cypress tests:
- Dynamic content where text might change:
// Valid use case
cy.get('[data-testid="user-notification"]').should('be.visible')
- Internationalized applications:
// Text content might vary by locale
cy.get('[data-testid="welcome-message"]').should('be.visible')
- Complex data grids or tables:
cy.get('[data-testid="data-grid-row-1"]')
  .should('contain', expectedData)
Conclusion
While Cypress’s documentation suggests using data-test attributes, we can write more maintainable tests by prioritizing selectors that reflect how users actually interact with our applications. The key is finding the right balance between test reliability and maintenance overhead.
When writing Cypress tests, ask yourself: “How would a user find this element?” If the answer isn’t “by looking for a data-test attribute,” consider using a more user-centric selector.
Sources:
03 Nov 2024
Introduction
Recently, I came across an interesting example on X that demonstrates this concept using Java. Let’s explore how we can take this further using Haskell’s type system.
The Java Approach
Here’s the original Java code:
record Book(String title, ISBN isbn, List<Author> authors) {
    Book {
        Objects.requireNonNull(title);
        if (title.isBlank())
            throw new IllegalArgumentException("Title must not be blank");

        Objects.requireNonNull(isbn);
        Objects.requireNonNull(authors);
        if (authors.isEmpty())
            throw new IllegalArgumentException("There must be at least one author");

        // plus immutable copies as in the previous article
    }
}
This code does enforce our business rules:
- Title cannot be null or blank
- ISBN cannot be null
- Authors list cannot be null or empty
However, there are several issues with this approach:
- Runtime Validation: All checks happen at runtime. We won’t know about invalid data until the program is running.
- Defensive Programming: We need to manually check for all invalid cases.
- Documentation Required: Nothing in the type signature tells us about these constraints.
- Partial Functions: The constructor can fail at runtime.
The Haskell Approach
Let’s see how we can use Haskell’s type system to enforce these rules at compile time while adding additional type safety:
{-# LANGUAGE OverloadedStrings #-}
{-# LANGUAGE RecordWildCards #-}
{-# LANGUAGE StrictData #-}

module Main where

import Control.Monad (when)
import Data.Text (Text)
import qualified Data.Text as T
import Data.List.NonEmpty (NonEmpty(..))
import qualified Data.List.NonEmpty as NE
import Data.Char (isDigit, isSpace)

-- New ISBN newtype for type safety
newtype ISBN = ISBN { unISBN :: Text }
  deriving (Show, Eq)

-- New Author newtype for type safety
newtype Author = Author { unAuthor :: Text }
  deriving (Show, Eq)

-- Improved Book type with newtypes
data Book = Book
  { bookTitle   :: !Text      -- Strict fields
  , bookISBN    :: !ISBN      -- Using ISBN newtype
  , bookAuthors :: !(NonEmpty Author)  -- Using Author newtype
  } deriving Show

-- Smart constructor for ISBN
mkISBN :: Text -> Either String ISBN
mkISBN text = do
  when (T.null text) $
    Left "ISBN must not be blank"
  let digits = T.filter isDigit text
  if T.length digits == 13 && T.all isDigit digits
    then Right $ ISBN text
    else Left "ISBN must be 13 digits"

-- Smart constructor for Author
mkAuthor :: Text -> Either String Author
mkAuthor text =
  if T.null text || T.all isSpace text
    then Left "Author name cannot be blank"
    else Right $ Author text

-- Smart constructor for NonEmpty list of authors
mkAuthors :: [Text] -> Either String (NonEmpty Author)
mkAuthors [] = Left "There must be at least one author"
mkAuthors texts = do
  authors <- traverse mkAuthor texts
  case authors of
    [] -> Left "There must be at least one author"  -- Should never happen due to previous check
    (a:as) -> Right $ a :| as

-- Smart constructor for Book
mkBook :: Text -> Text -> [Text] -> Either String Book
mkBook titleText isbnText authorTexts = do
  -- Title validation
  when (T.null titleText || T.all isSpace titleText) $
    Left "Title must not be blank"

  -- ISBN validation using smart constructor
  isbn <- mkISBN isbnText

  -- Authors validation using smart constructor
  authors <- mkAuthors authorTexts

  -- Create the book if all validations pass
  Right $ Book
    { bookTitle = titleText
    , bookISBN = isbn
    , bookAuthors = authors
    }
Key Improvements
- Stronger Type Safety
- Introduced
ISBN and Author newtypes to prevent mixing up text fields
- Each domain type has its own smart constructor with validation
- Strict fields for better performance
- NonEmpty List for Authors
- Guarantees at least one author at the type level
- No runtime checks needed for non-emptiness
- Makes the constraint explicit in the type signature
- Smart Constructors with Validation
- Separate validation logic for each domain type
- Composable validation using
Either
- Clear error messages for each validation failure
- Type-Level Guarantees
- Once a
Book exists, we know it’s valid
- Invalid states are impossible to represent
- Compiler enforces our domain rules
Here’s an example of using this improved implementation:
{-# LANGUAGE OverloadedStrings #-}
{-# LANGUAGE RecordWildCards #-}
{-# LANGUAGE StrictData #-}

module Main where

import Control.Monad (when)
import Data.Text (Text)
import qualified Data.Text as T
import Data.List.NonEmpty (NonEmpty(..))
import qualified Data.List.NonEmpty as NE
import Data.Char (isDigit, isSpace)

-- Domain Types
newtype ISBN = ISBN { unISBN :: Text }
  deriving (Show, Eq)

newtype Author = Author { unAuthor :: Text }
  deriving (Show, Eq)

data Book = Book
  { bookTitle   :: !Text
  , bookISBN    :: !ISBN
  , bookAuthors :: !(NonEmpty Author)
  } deriving Show

-- Smart Constructors
mkISBN :: Text -> Either String ISBN
mkISBN text = do
  when (T.null text) $
    Left "ISBN must not be blank"
  let digits = T.filter isDigit text
  if T.length digits == 13 && T.all isDigit digits
    then Right $ ISBN text
    else Left "ISBN must be 13 digits"

mkAuthor :: Text -> Either String Author
mkAuthor text =
  if T.null text || T.all isSpace text
    then Left "Author name cannot be blank"
    else Right $ Author text

mkAuthors :: [Text] -> Either String (NonEmpty Author)
mkAuthors [] = Left "There must be at least one author"
mkAuthors texts = do
  authors <- traverse mkAuthor texts
  case authors of
    [] -> Left "There must be at least one author"
    (a:as) -> Right $ a :| as

mkBook :: Text -> Text -> [Text] -> Either String Book
mkBook titleText isbnText authorTexts = do
  when (T.null titleText || T.all isSpace titleText) $
    Left "Title must not be blank"

  isbn <- mkISBN isbnText
  authors <- mkAuthors authorTexts

  Right $ Book
    { bookTitle = titleText
    , bookISBN = isbn
    , bookAuthors = authors
    }

-- Helper function to display validation result
displayResult :: Either String Book -> IO ()
displayResult result = case result of
  Left err -> putStrLn $ "Error: " ++ err
  Right book -> putStrLn $ "Successfully created book: " ++ show book

-- Main function with test cases
main :: IO ()
main = do
  putStrLn "Testing book validation..."
  putStrLn "\n1. Valid book:"
  displayResult $ mkBook "Dune" "9780441172719" ["Frank Herbert"]

  putStrLn "\n2. Valid book with multiple authors:"
  displayResult $ mkBook "Good Omens" "9780441172719" ["Terry Pratchett", "Neil Gaiman"]

  putStrLn "\n3. Invalid: Empty title:"
  displayResult $ mkBook "" "9780441172719" ["Frank Herbert"]

  putStrLn "\n4. Invalid: Blank title (only spaces):"
  displayResult $ mkBook "   " "9780441172719" ["Frank Herbert"]

  putStrLn "\n5. Invalid: Wrong ISBN format:"
  displayResult $ mkBook "Dune" "123" ["Frank Herbert"]

  putStrLn "\n6. Invalid: No authors:"
  displayResult $ mkBook "Dune" "9780441172719" []

  putStrLn "\n7. Invalid: Blank author name:"
  displayResult $ mkBook "Dune" "9780441172719" ["  "]

  putStrLn "\n8. Invalid: Mix of valid and invalid authors:"
  displayResult $ mkBook "Dune" "9780441172719" ["Frank Herbert", "", "Kevin J. Anderson"]

  putStrLn "\n9. Invalid: Non-numeric ISBN:"
  displayResult $ mkBook "Dune" "abc0441172719" ["Frank Herbert"]

  putStrLn "\n10. Valid: ISBN with hyphens (still has 13 digits):"
  displayResult $ mkBook "Dune" "978-0441172719" ["Frank Herbert"]
Benefits of This Approach
- Type-Level Guarantees
- Domain rules enforced by the compiler
- No need for defensive programming
- Invalid states are unrepresentable
- Self-Documenting Code
- Types clearly indicate constraints
- Newtypes make the domain model explicit
- Smart constructors document validation rules
- Better Error Handling
- Validation results are explicit in return types
- No runtime exceptions
- Composable error handling
- Maintainability
- Easy to add new constraints
- Validation rules are reusable
- Type system catches errors at compile time
Conclusion
While the Java solution enforces business rules through runtime checks and exceptions, our improved Haskell approach pushes these checks to the type system and makes invalid states truly unrepresentable. The addition of newtypes and strict fields further enhances type safety and performance.
Key takeaways:
- Use types to encode business rules when possible
- Push validation to the boundaries of your system
- Make impossible states impossible, not just checked
- Let the compiler help you enforce your domain rules
- Use newtypes to prevent mixing up similar types
- Make data structures strict when appropriate
The end result is a system that’s not only safer but also more maintainable and self-documenting.