Modernizing the Spring Boot Kotlin Tutorial: A Developer's Guide with Neovim
17 Nov 2024After over a 6-year hiatus from Spring Boot in my professional work, I found myself curious about how the ecosystem had evolved. I wondered if I could make it work without reaching for the traditional IntelliJ IDEA approach, because “nvim btw”. Here’s what I discovered while attempting to modernize a Spring Boot Kotlin tutorial using just Neovim as my development environment. Neovim boots up in less than a second and compilation is blazing fast.
The State of the Tutorial
The original Spring Boot Kotlin tutorial, despite its age, remains surprisingly relevant. However, there are several key modern considerations:
- Gradle configuration now uses the Kotlin DSL (
build.gradle.kts) - Updated dependencies including Spring Boot 3.x and Kotlin 1.9.x
- Modern Java toolchain requirements (JDK 21)
- Usage of Jakarta EE instead of javax packages
- Enhanced Kotlin compiler options and Spring plugin configurations
Project Setup
Before diving into development, you’ll need to set up your environment. Here’s what you need:
Prerequisites
- Java Development Kit (JDK) 21
brew install openjdk@21After installation, make sure JAVA_HOME is set correctly in your shell configuration.
- Gradle Build Tool
brew install gradleWhile the project includes the Gradle wrapper (
gradlew), having Gradle installed locally can be helpful for other Kotlin projects. - Clone and Build
git clone https://github.com/sngeth/spring-boot-kotlin-demo
cd spring-boot-kotlin-demo
./gradlew build
Neovim as Your Kotlin IDE
One of the most interesting aspects of this journey was using Neovim instead of traditional IDEs like IntelliJ IDEA. Here’s how to make Neovim a powerful Kotlin development environment:
Essential Tools
- Kotlin Language Server: The backbone of Kotlin development in Neovim
- Provides code completion
- Offers type information
- Handles syntax highlighting
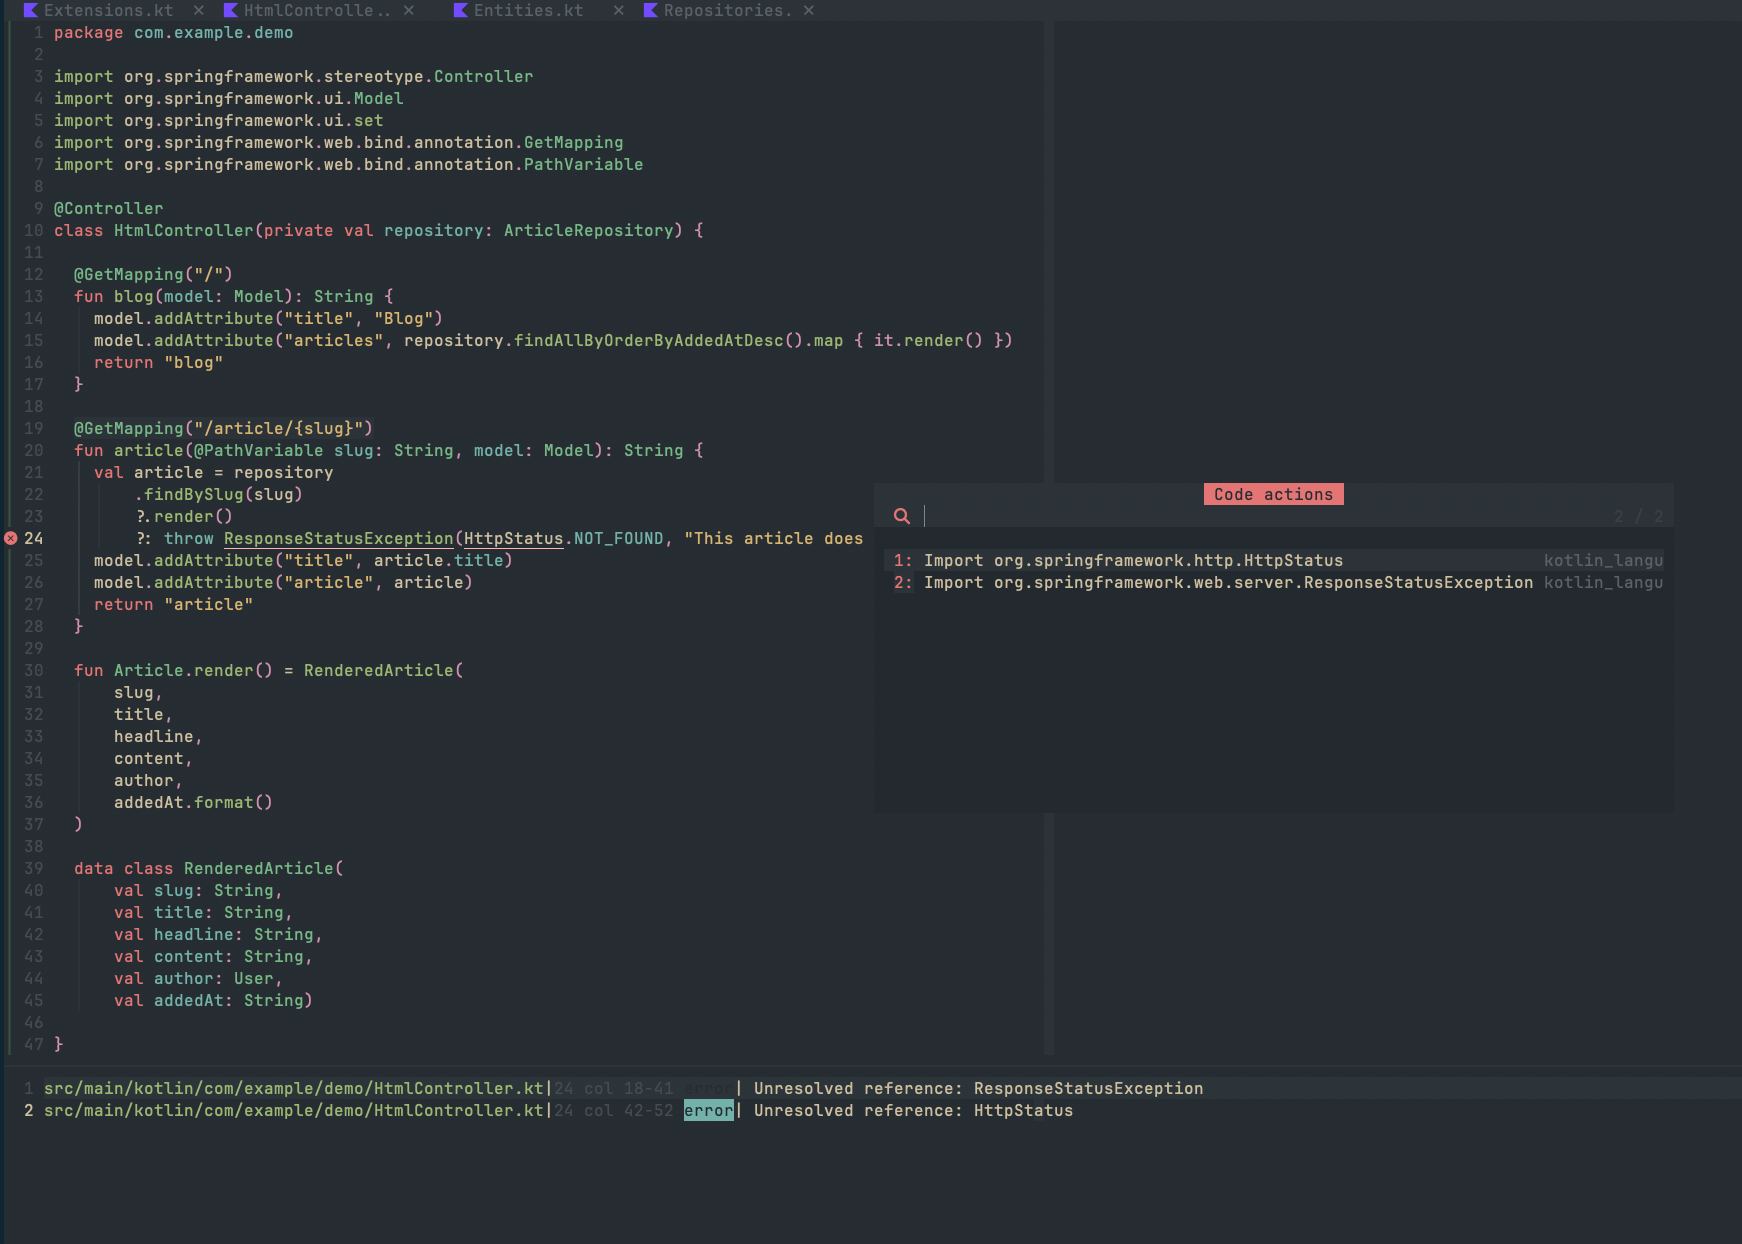
- Detects missing imports automatically
brew install kotlin-language-server - LSP Configuration:
require('lspconfig').kotlin_language_server.setup({ cmd = { "kotlin-language-server" }, filetypes = { "kotlin" }, root_dir = require('lspconfig.util').root_pattern( "settings.gradle", "settings.gradle.kts", "build.gradle", "build.gradle.kts" ) }) - Code Actions: This functionality comes from multiple sources:
- The built-in LSP client in Neovim (
:h lsp) nvim-cmpfor completionnull-lsornone-lsfor additional formatting- Popular plugins like
nvim-code-action-menu
- The built-in LSP client in Neovim (
Development Workflow
Instead of relying on IDE-integrated build tools, the workflow becomes:
./gradlew build -t
This continuous build approach:
- Watches for file changes
- Recompiles automatically
- Provides quick feedback on errors
- Eliminates the need for IDE-specific build processes
Advantages of This Setup
- Lightweight Development Environment
- Faster startup times
- Lower resource usage
- Familiar Vim keybindings
- Modern Development Features
- Code completion via LSP
- Inline error highlighting
- Jump-to-definition functionality
- Symbol search across the project
- Build Process Transparency
- Clear visibility of the build process
- Direct control over Gradle commands
- No IDE abstraction layer
Common Pitfalls and Solutions
- Import Management
- Challenge: Missing IDE auto-import
- Solution: Kotlin Language Server handles this effectively
- Tip: Use
:LspRestartif imports aren’t updating
- Compile Error Detection
- Challenge: No immediate visual feedback
- Solution: Continuous Gradle build (
-tflag) - Enhancement: Configure quickfix list integration
- Code Actions Availability
- Challenge: Understanding source of actions
- Solution: Multiple plugins working together:
- LSP for basic actions
- Additional plugins for enhanced functionality
- Custom keybindings for frequent actions
Recommended Neovim Plugins for Kotlin Development
- Base LSP Setup:
'neovim/nvim-lspconfig' 'hrsh7th/nvim-cmp' 'hrsh7th/cmp-nvim-lsp' - Enhanced Functionality:
'nvim-code-action-menu'
'telescope.nvim'
'null-ls.nvim'
Conclusion
While the Spring Boot Kotlin tutorial may be showing its age, the core concepts remain solid. Combining it with modern tools like Neovim and the Kotlin Language Server creates a powerful, efficient development environment. The continuous build approach with Gradle provides quick feedback, while LSP integration offers many features traditionally associated with full IDEs.
This setup proves that you don’t need a heavy IDE to develop Spring Boot applications with Kotlin effectively. The combination of Neovim’s efficiency, LSP’s intelligence, and Gradle’s build tools creates a streamlined, modern development experience that can rival traditional IDEs while maintaining the flexibility and lightness of a terminal-based workflow.